
 , and I’m so glad to have gotten to know these particular cookies. After baking a batch and taking them to the gym, just a few days later, I was pulling out the book to bake them again for a birthday. It could have been the hint of espresso in the cookies that works wonders with the chocolate chunks, but really it was probably the salty pretzels that are stirred into the dough that made me like these cookies so much. This is a cookie dough that needs to rest and firm up in the refrigerator, so you do have to plan ahead. The dry ingredients were whisked together, and those included flour, baking soda, baking powder, and salt. Oats were then added to that mix. Butter was creamed with granulated sugar and dark brown sugar, and an egg, egg yolk, and then vanilla were added. Espresso powder was dissolved in hot water, and that was mixed into the butter mixture. The dry ingredients were stirred into the dough, and last, chocolate chunks and broken pretzel pieces were added. The dough was left in the refrigerator for about four hours. After scooping balls of dough onto the cookie sheets, more broken pretzel pieces were pressed into the top of each dough ball. The cookies baked for twelve or so minutes, and then I wanted to eat them all.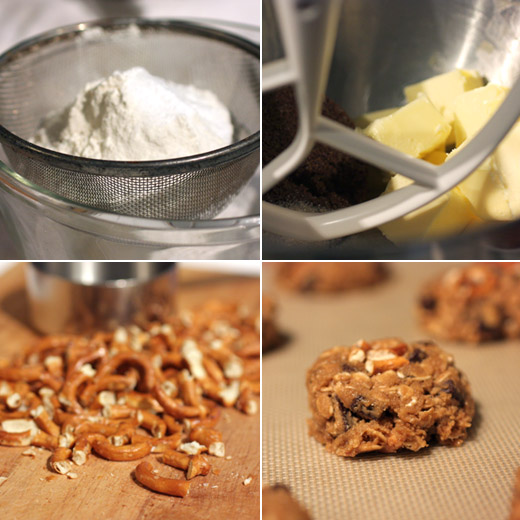
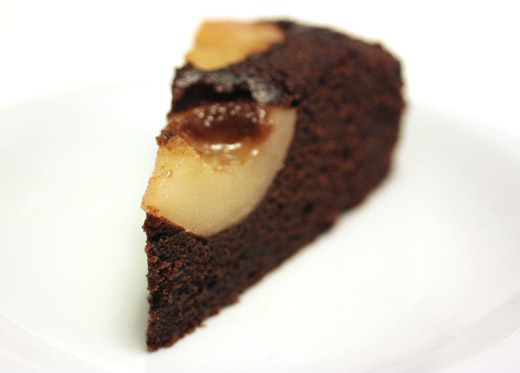
 looking for something, and now I don’t even remember what that was. As the pages of the chocolate chapter flipped by, I caught a glimpse of the gorgeous cake with halved pears nestled into it with a sticky, caramelly top. I had to know more about this cake. There were pears in my refrigerator that had just arrived from my CSA, and I always have cocoa powder on hand. It was entirely possible that I could go straight to the kitchen and make this cake. A quick scan of the ingredient list confirmed that I indeed had everything I would need. And, hence, off I went forgetting all about whatever it was that made me pick up the book in the first place. I’m sure I’ll think of it eventually, but for the time being, I was very happy to focus on this chocolate pear cake. It’s an easy, upside-down, fruit-filled cake with a built-in caramel sauce that ends up glistening on top and settling into the cored-out pears when the cake is turned out onto a platter. You’ll want to use small pears, and the ones I had were just the right size. They should be peeled, halved, and cored. I use a melon baller to remove the cores from pears and then a knife to cut out any pieces of core that are missed on the edges of the pears. The pear halves were cooked in a skillet in a mixture of melted butter, brown sugar, and water. You’ll need to adjust the cooking time depending on how firm your pears are. They should soften some but still be able to hold their shape while baking. After a few minutes or so of cooking, the skillet was removed from the heat and set aside. A nine inch round cake pan was lined with parchment paper. Then, room temperature butter and more brown sugar were mixed, and three eggs were added one at a time. Flour, baking powder, and cocoa powder were sifted together and then stirred into the butter mixture. The pears were placed in the prepared cake pan cut-side down, and the buttery caramel was poured over them. The chocolate batter was spooned over the pears, and the cake baked for 50 minutes.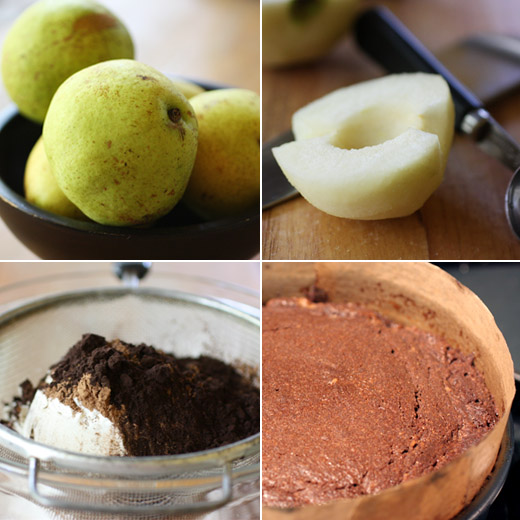
![]()
 , and coconut is added to the dough. I bought a bag of natural, unsweetened, shredded coconut and then worried that the cookies wouldn't be sweet enough since I didn't use the regular, sweetened stuff. I tasted the dough before I baked the cookies to see if I thought I should add more sugar, and it seemed good to me. Kurt was happy to taste test a cookie fresh out of the oven, and his reaction made me confident they were just fine. The cookies almost disappeared before I could box them up for shipping. There was nothing unusual about making the cookie dough here. You could use chocolate chips, but the recipe called for chunks, so I chopped a bar of bittersweet chocolate into bits. At two different cooking classes I attended, I learned the same lesson from both Nick Malgieri and Alice Medrich. When you chop chocolate into chunks for cookies, you want to leave the chocolate dust behind. Nick Malgieri places the chopped chocolate in a sieve and shakes it to remove the pulverized stuff and keep the chunks. Alice Medrich used her hands to pull the chunks away from the dust on the cutting board. The fine, powdery chocolate muddies the look of the dough and using only the chunks results in a neater cookie. So, cream butter and brown sugar, add an egg and vanilla, sift flour, baking soda, and salt and add oatmeal then add that to butter mixture, then fold in shredded coconut and natural, unsweetened is fine and neat, dust-free, chocolate chunks. Drop into mounds on baking sheets and bake.
![]()

 . They’re thin and crisp chocolate wafer cookies sandwiched with a layer of mint-flavored white chocolate, and this was just one of four ways these cookies were presented in the book. With several of the cookie recipes, Alice Medrich included “upgrades” or variations on the theme. In this case, the base recipe was plain chocolate wafers. The possible upgrades for these were spicy wafers with cinnamon, cayenne, and ground black pepper added to the dough, extra-bittersweet wafers with added ground unsweetened chocolate, and the version I made with white chocolate and mint sandwiched between two wafers. The dough requires some time in the refrigerator before being cut into cookies which means it can be made well in advance. It was entirely mixed in a food processor. First, flour, cocoa, sugar, salt, and baking powder were pulsed, and then chopped, softened butter was mixed in by pulsing. Last, milk and vanilla were added through the feed tube while the machine was running. The dough was formed into a log, wrapped in parchment, and chilled for at least an hour. Possibly the most difficult part of this recipe was cutting the dough into thin rounds. The log was marked at one inch lengths, and each inch of dough was cut into six skinny, little, fragile cookies. The rounds were baked, and as soon as they came out of the oven, small circles were cut in half of them. I used the big end of a piping tip to cut the circles. When the cookies were cool, white chocolate was melted and mixed with mint extract for the filling. Scant half teaspoons of white chocolate filling were spread on half of the cookies which were topped with the ones with holes.

 book. Again, the cake itself was a little rich with lots of butter, it had a more traditional coconut and pecan frosting, but it was also decorated with a ruffle of milk chocolate buttercream around the top. Last, I looked to The Greyston Bakery Cookbook where I found the layers were made from nice, airy chocolate chiffon, and the frosting was straightforward and traditional. Here’s what happened: I baked the chocolate chiffon layers from Greyston Bakery, I attempted Bobby Flay’s cajeta frosting and ended up changing it, and I coated the sides of the cake in the milk chocolate buttercream from Baked.Making the cake layers was simple, and they turned out lovely. The cake ingredients were whisked together, egg whites were whipped to soft peaks, and the whites were folded into the batter. No problems there. Then, I just knew by looking at Bobby’s cajeta frosting recipe there were going to be issues. I seem to lack the ability to make a mixture of caramel and milk thicken, but I foolishly moved forward anyway. You start by caramelizing sugar and then adding whole milk, coconut milk, goat milk, seeds from a vanilla bean, and some light corn syrup, and then you let that simmer and reduce for about an hour. I shouldn’t have turned away from the stove while milk was coming to a boil, and so that was exactly what I did at exactly the wrong moment. Of course, it did boil over, and I caught it a second too late. I moved the saucepan to another burner and continued. The mixture eventually reduced, but it didn’t seem to be thickening. After more than an hour of simmering, I turned off the heat and added the butter, vanilla extract, and rum and poured the milk mixture into a bowl to cool. It didn’t thicken, but it was delicious. Since I wasn’t willing to waste all those ingredients and because it was in fact quite delicious, I decided to wing it in an attempt to save the frosting. I poured the cooled mixture back into a clean saucepan and added two egg yolks and a another couple of tablespoons of butter. As it came back up to a simmer, it thickened and the frosting was saved. Back into a bowl it went to cool again, and then shredded coconut and chopped pecans were added. The version of the cake in the Baked book with the milk chocolate buttercream on top was calling to me. I made the buttercream. I pulled out a piping bag. I set one cake layer on a platter and piped a circle of buttercream around the perimeter to hold in the other frosting. The now cooled and thickened coconut pecan frosting was added inside the buttercream ring, and the second layer was set on top. Then, I realized that I have no business using a piping bag especially at the end of a long baking day. So I smoothed the chocolate frosting around the sides of the cake, added the remaining coconut pecan frosting on top, and decorated with a trail of finely chopped pecans around the base and top edge of the cake.
This looked a sure-fire idea when I saw it in the January issue of Living magazine. There’s no way a mix of salty pretzels, creamy, fresh peanut butter, and rich, melted chocolate could go wrong. The one-page article was about fresh hard pretzels sold at farmers’ markets. I’d never seen pretzels at our local markets, but I definitely would have bought them if I had. I checked with my friend Kristi, from Austin Farm to Table, who visited several farmers’ markets in different parts of the country last year, and she had only seen pretzels at a market in New York. I’m curious if anyone else gets to buy locally made pretzels at farmers’ markets, or if it’s just the lucky people of New York? Well, regardless of where you get the pretzels, and I found some very good ones at the grocery store, these candies are still going to be outstanding. They’re simple to make and highly addictive.So, I bought some big, crunchy pretzels and proceeded to smash them which just seemed wrong even though it was necessary here. The crushed pretzel bits were combined with creamy, natural peanut butter, confectioners’ sugar, and a little room-temperature butter. All of that was stirred together, and then one inch balls were formed and set on a tray. The tray was placed in the freezer for 30 minutes to let the peanut butter become firm. Then, it was chocolate dipping time. I used milk chocolate, but you could use whatever you prefer. I like El Rey milk chocolate which has a slightly higher cacao percentage than others. After dipping each candy piece and before the chocolate completely set, I sprinkled sea salt on top.

 , and the recipe was contributed by Nick Malgieri. They’re like a Sicilian homemade Fig Newton except for the shape of course. A fig filling, and let me tell you that was one amazing fig filling, was wrapped in dough, rolled into a long cylinder, and cut into pieces which were sliced on the ends and pulled into an X. This was a little bit of a project compared to simpler drop cookies, but I thought the process was fun since it worked exactly as described with no problems. Regarding that filling, it was a grown-up kind of fig filling full of aromatic and delicious things mixed with dried figs like almonds, apricot preserves, golden raisins, candied orange peel, chocolate, dark rum, and cinnamon. I tasted the filling just after it was pureed and realized it could have been served in bowls for dessert all by itself. There’s only a small amount of chocolate, so it doesn’t taste like a chocolate Fig Newton, but the chocolate with all the other filling ingredients makes it a sophisticated mix of flavors. And, the shape is an X which is appropriate for Valentine’s Day even though I didn’t make any O’s, right?The pastry and the filling were both made in a food processor, and cleaning between steps wasn’t even necessary. The pastry, or pasta frolla, was made by pulsing flour, sugar, baking powder, and salt in the food processor before adding chopped, cold butter. The butter was cut into the flour by pulsing, and then eggs were added and mixed to form a dough. The dough was kneaded briefly, formed into a log, and covered and set aside. The bowl of the food processor was set back in place, and the filling was made in it next. That was a pureed mix of chopped dried figs, toasted and chopped almonds, apricot preserves, golden raisins, candied orange peel, and yes I was thrilled to use my own candied orange peel again, chopped semisweet chocolate, dark rum, and cinnamon. There are great tips in the recipe such as reminding you that the dried fruit will not become softer or moister after baking. Therefore, if your dried fruits are too dry, they should be plumped in water and drained before using. Although I was tempted to stop there and just eat the filling with a spoon or maybe save a little to plop on top of yogurt for breakfast the next morning, I did continue with the recipe by forming the filling into a log and cutting that into 12 pieces. The pastry was also cut into 12 pieces. Working with one piece of pastry at a time, it was rolled against the countertop into a rope 15 inches long. Then, it was flattened into a three inch wide rectangle. Don’t even bother with a rolling pin. The dough is very easy to press and flatten into the rectangular shape. Just have some flour nearby to sprinkle on the counter to prevent sticking. Next, one piece of filling was rolled into a 15 inch long rope and set on the pastry. The pastry was rolled around the filling and pressed to seal. That filled rope shape was cut into three inch long pieces. Each piece was cut on each end so the ends could be pulled out to form an X shape. It’s really more complicated to write this than it was to do it. The cookies were baked, cooled, and then topped with confectioners’ sugar.

 that author Melissa Clark’s husband doesn’t eat much dairy, and she had created a frozen treat for him using coconut milk. If I could still have something a lot like ice cream for dessert, while not having cream, I could do this dairy-free thing for a short while.Not only is this an ice cream kind of dessert with no cream, it also has no eggs. It’s made with coconut milk which is naturally rich, but the end result is still a bit lighter than an average ice cream recipe. You begin by warming coconut milk and sugar in a saucepan until the sugar dissolves. Then, chopped bittersweet chocolate, cocoa powder, dark rum, and a little salt were added, and that was whisked until the chocolate was melted and the mixture was smooth. Once again, I used a mix of regular cocoa powder and some black onyx cocoa powder which gives the mixture a good, dark color. The coconut mixture was then transferred to a measuring pitcher and chilled before being refrigerated for a few hours. Once completely cold, it was churned in an ice cream maker.


Last week, I was planning to bake cookies for some friends, and I wanted to come up with something their kids would really like. I asked Kurt what kind of cookies I should bake. His answer, shockingly, was chocolate chip. You should know that anytime, anywhere, under any circumstances, when asked what type of cookie should be baked, Kurt’s answer will be chocolate chip. And, he backed up that predictable response by informing me that everyone likes chocolate chip and surely that would make the kids happy. Well, he had a point, but I also wanted to offer something a little bit different and fun. I went searching through both paper and digital files and found these s’mores cookies that I bookmarked from a cookie slideshow. I thought they definitely qualified as fun. They’re also really easy to make. The cookie base has whole wheat flour and ground oats that give it a graham cracker vibe, and the toasted marshmallow topping looks as good as it tastes.The cookie dough was started in a food processor by first pulsing the oats until finely ground. All purpose and whole wheat flours were added with cinnamon, baking soda, and salt, and that was pulsed to combine. In a separate bowl, butter was mixed with brown sugar and an egg, and then the flour mixture was added. The cookies were shaped by the tablespoon on baking sheets and topped with squares of chocolate. I used milk chocolate thinking that kids probably prefer that to darker chocolate. The cookies baked for about thirteen minutes, and then each was topped with a marshmallow cut in half. One baking sheet at a time was placed under the broiler for a minute or so to toast the marshmallows.

 , and that’s where I found the recipes I used here.


I think I’ve started a tradition, and I think it’s a good one. You see, every year my spinning instructor starts dropping hints about his birthday a couple of weeks before it arrives. Last year, I took the hints and decided to bring some cupcakes to class on his big day. Having cupcakes in the spinning room was so wrong, so antithetical, so naughty, and so great. One year later, I had to do it again, and this time, I looked to Demolition Desserts for a completely decadent cupcake. The candy bar cupcake is intended to taste like a Snickers bar. It’s a brown sugar cake with caramel filling, a rich chocolate and peanut butter frosting with roasted peanuts on top, and a sprinkling of sea salt. A woman at the front of the room, near the tray of cupcakes, said: I love smelling chocolate while on a spinning bike. It is very good motivation.The cakes themselves are made with dark brown sugar and were tender and nicely flavored by themselves. As they baked and cooled, the caramel sauce was made from water, cream of tartar, sugar, and light corn syrup. After that mixture came up to temperature, butter and cream were added, and then it was simmered briefly. I chilled the caramel in the refrigerator before piping it into the cupcakes. The technique is a simple one. You push a one-quarter inch tip on a bag filled with the sauce into the top of a cupcake and squeeze in the caramel until the top of the cake just begins to rise a bit. A little caramel dribbles out on top, and that’s fine. The frosting was next, and that was made with milk chocolate, bittersweet chocolate, heavy cream, peanut butter, and buttercream frosting. I thought it was a little strange that one of the ingredients in the frosting was a half cup of buttercream frosting from another page in the book. Instead, this recipe could have just called for enough butter, confectioners’ sugar, milk, and vanilla to make up one half cup. At any rate, I mixed a little buttercream separately and added it to the chocolate peanut butter frosting, and the finished product was delicious. That was swirled onto the cupcakes and topped with roasted peanuts and sea salt.


