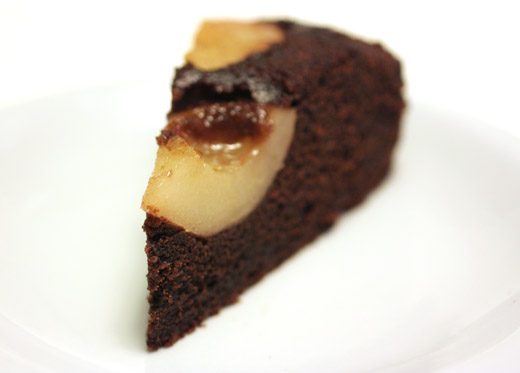
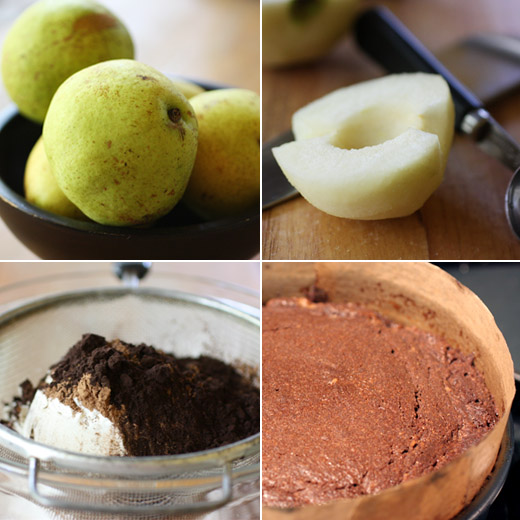
 looking for something, and now I don’t even remember what that was. As the pages of the chocolate chapter flipped by, I caught a glimpse of the gorgeous cake with halved pears nestled into it with a sticky, caramelly top. I had to know more about this cake. There were pears in my refrigerator that had just arrived from my CSA, and I always have cocoa powder on hand. It was entirely possible that I could go straight to the kitchen and make this cake. A quick scan of the ingredient list confirmed that I indeed had everything I would need. And, hence, off I went forgetting all about whatever it was that made me pick up the book in the first place. I’m sure I’ll think of it eventually, but for the time being, I was very happy to focus on this chocolate pear cake. It’s an easy, upside-down, fruit-filled cake with a built-in caramel sauce that ends up glistening on top and settling into the cored-out pears when the cake is turned out onto a platter. You’ll want to use small pears, and the ones I had were just the right size. They should be peeled, halved, and cored. I use a melon baller to remove the cores from pears and then a knife to cut out any pieces of core that are missed on the edges of the pears. The pear halves were cooked in a skillet in a mixture of melted butter, brown sugar, and water. You’ll need to adjust the cooking time depending on how firm your pears are. They should soften some but still be able to hold their shape while baking. After a few minutes or so of cooking, the skillet was removed from the heat and set aside. A nine inch round cake pan was lined with parchment paper. Then, room temperature butter and more brown sugar were mixed, and three eggs were added one at a time. Flour, baking powder, and cocoa powder were sifted together and then stirred into the butter mixture. The pears were placed in the prepared cake pan cut-side down, and the buttery caramel was poured over them. The chocolate batter was spooned over the pears, and the cake baked for 50 minutes.

 by Jennie Schacht, and the Basket of Berries chapter had given me several good ideas. Just about any berries can be used in these desserts even though several are shown with strawberries. The strawberries and cream roll cake looked good as did the mixed berry pavlovettes with lemon-lime cream. But, when I read the recipe for the strawberry buckwheat tea cake and learned that it was made with browned butter, my decision was made. I used those prized blackberries instead of strawberries of course. The inspiration for this tea cake was strawberry and buckwheat pancakes. By adding browned butter to the cake batter, it becomes reminiscent of a buttery stack of pancakes. There’s also thick yogurt in the cake giving it great texture.The first step of this recipe is aromatherapy in the form of browning butter. One stick was melted and then swirled in the pan as it became nutty-smelling and more delicious by the minute. That was left to cool while AP flour, buckwheat flour, sugar, baking powder, baking soda, and salt were combined. Then, Greek yogurt, eggs, and vanilla were added to the butter, and that mixture was stirred into the dry ingredients. Last, the precious blackberries were folded into the batter, and the batter was spread in a square baking pan. Now, some of the berries were to be set aside and tossed with sugar so the juices would start running, and then the berries and resulting juice could be used to top the whipped cream served on the pieces of cake. I have a thing about not wanting much sugar with my berries because I like them just the way they are with a little tartness peeking through here and there. So, I left the remaining berries plain and there were no running juices to drip over the whipped cream. I did, however, follow the suggestion at the beginning of the book to add creme fraiche to the whipped cream.


 since receiving a review copy last fall. Not only has everything from the book been completely delicious, the recipes have also just worked really well. Even if you have a standard approach to apple pie, and I did, the one from this book might change your mind about it. The techniques resulted in the best apple pie I’ve ever made. So, I’ve come to trust this book, and I’m thrilled that Joanne Chang is working on a second one. I knew there would be a good option for a birthday cake in Flour. The name of the cake in the book is lemon-raspberry cake with lemon buttercream, but I had fresh, local strawberries to use instead. It’s intended as a three layer cake with lemon curd mixed with buttercream and berries between each layer. I cut the quantity down to two layers for the cakes and stored the extra buttercream and lemon curd in the freezer for another use. This was a special occasion cake, meaning there are a few parts to making it, although none of them are difficult. I started by making the lemon curd in advance, and I used meyer lemons for the juice. The next day, I made the cakes which began by creaming together butter and sugar and then adding vanilla and lemon zest. A mixture of flour, baking powder, and salt were added alternately with milk. Last, egg whites were beaten until they held peaks, and they were folded into the cake batter. While the cakes baked and cooled, I gathered ingredients for the French buttercream. First, a sugar syrup was made in a saucepan, and it was brought to 238 degrees F. Eggs and egg yolks were mixed in a stand mixer until pale, and then the syrup was slowly added to the eggs while mixing on low speed. Once all the syrup was added, the speed was increased to medium, and it was mixed until fluffy and cool. Next came the butter, and this was an obscene amount of butter. Three cups of butter were cut into chunks, and the chunks were slowly added while mixing until the buttercream became smooth and lovely. A pinch of salt was added, and the frosting was completed. One last item to make was the lemon syrup which was a mix of lemon juice, sugar, and water which was brought to a boil to dissolve the sugar and then left to cool. That lemon syrup was brushed on top of each cake layer before the filling and toppings were added. A little of the lemon curd was mixed with a little of the buttercream to make the filling that was placed between the cake layers. And, I need to pause for a moment while I remember that mixture of lemon curd and buttercream because it was delightful. I placed some of it in a plastic bag so I could pipe a quick circle of the mixture around the edge, and that held the berries in place preventing berry juice from running on the outside of the cake. Sliced strawberries were placed on the curd-buttercream layer inside the circle barrier. The other cake layer went on top, it was brushed with lemon syrup, and the remaining plain buttercream was used to frost the top and sides of the layers. Last, some lemon curd was spread on top of the cake, and I decorated with a few whole strawberries.


 book. Again, the cake itself was a little rich with lots of butter, it had a more traditional coconut and pecan frosting, but it was also decorated with a ruffle of milk chocolate buttercream around the top. Last, I looked to The Greyston Bakery Cookbook
 where I found the layers were made from nice, airy chocolate chiffon, and the frosting was straightforward and traditional. Here’s what happened: I baked the chocolate chiffon layers from Greyston Bakery, I attempted Bobby Flay’s cajeta frosting and ended up changing it, and I coated the sides of the cake in the milk chocolate buttercream from Baked.Making the cake layers was simple, and they turned out lovely. The cake ingredients were whisked together, egg whites were whipped to soft peaks, and the whites were folded into the batter. No problems there. Then, I just knew by looking at Bobby’s cajeta frosting recipe there were going to be issues. I seem to lack the ability to make a mixture of caramel and milk thicken, but I foolishly moved forward anyway. You start by caramelizing sugar and then adding whole milk, coconut milk, goat milk, seeds from a vanilla bean, and some light corn syrup, and then you let that simmer and reduce for about an hour. I shouldn’t have turned away from the stove while milk was coming to a boil, and so that was exactly what I did at exactly the wrong moment. Of course, it did boil over, and I caught it a second too late. I moved the saucepan to another burner and continued. The mixture eventually reduced, but it didn’t seem to be thickening. After more than an hour of simmering, I turned off the heat and added the butter, vanilla extract, and rum and poured the milk mixture into a bowl to cool. It didn’t thicken, but it was delicious. Since I wasn’t willing to waste all those ingredients and because it was in fact quite delicious, I decided to wing it in an attempt to save the frosting. I poured the cooled mixture back into a clean saucepan and added two egg yolks and a another couple of tablespoons of butter. As it came back up to a simmer, it thickened and the frosting was saved. Back into a bowl it went to cool again, and then shredded coconut and chopped pecans were added. The version of the cake in the Baked book with the milk chocolate buttercream on top was calling to me. I made the buttercream. I pulled out a piping bag. I set one cake layer on a platter and piped a circle of buttercream around the perimeter to hold in the other frosting. The now cooled and thickened coconut pecan frosting was added inside the buttercream ring, and the second layer was set on top. Then, I realized that I have no business using a piping bag especially at the end of a long baking day. So I smoothed the chocolate frosting around the sides of the cake, added the remaining coconut pecan frosting on top, and decorated with a trail of finely chopped pecans around the base and top edge of the cake.


 , and that’s where I found the recipes I used here.


 As I was reading The New Spanish Table, I was so excited about the tapas, seafood, and rice chapters, I didn’t really even expect much from desserts. I should have known better. There are ice creams, sorbets, and granitas with flavors ranging from honey and cinnamon to beet and strawberry. There are also confections and cookies such as the orange and pistachio magdalenas seen here. These light, little, tea cakes are made with olive oil instead of butter and are flavored with orange juice, orange zest, and orange flower water. Something about the fragrance of orange flower water seems like summer to me. Is there a flower that blooms in the summer with a similar scent? Whatever it is about it, I like it, and it added another dimension to the Moorish-inspired flavors of these delicate, mini cakes. They’re similar to French madeleines but were baked in a mini-muffin pan.
The batter was started by mixing eggs and confectioners’ sugar. Then a combination of flour, salt, and baking powder was added alternately with a combination of cream, orange juice, and olive oil. Last, chopped, toasted pistachios, orange zest, and orange flower water were added. The batter was covered and left to rest for 30 minutes before being baked in buttered mini-muffin cups. After the cakes cooled, they were dusted with a sprinkling of confectioners’ sugar.
 It’s a good thing these are simple to make because they disappear from a serving platter quickly. They’re cute and so light that when you pick up the bite-sized morsels, you quickly lose count of how many you’ve sampled. Since I hid some away to ensure they’d last a few days, I can also report that they keep very well, and the layered orange flavors are perfect with a cup of tea.

 I’m not always good at making decisions. That’s especially true when it comes to choosing a type of cake to bake for a special occasion. First, I was sure a lemon cake would be great, but that was before I became taken with the idea of a little raspberry cream number. Then, I realized I better pull out the files and check to see if there was something long-forgotten and hidden-away that might be perfect. Indeed, there was just such a cake. It was this butterscotch-pecan cake which first appeared in the November 2008 issue of Living, and I had forgotten all about it. Butterscotch cake with a smidgen of rum in it, butterscotch cream cheese frosting, and chopped pecans to finish it, and I was sold. This is a grand cake which was intended to be three layers tall. Somehow, three layers always seems like a lot of cake to me, so as usual, I only baked two layers, baked the remaining batter as cupcakes, and froze the cupcakes for another day. I won’t suggest that this is a quick and easy kind of cake. Well, there’s nothing difficult about it, but there are several steps involved, and some of those steps require cooling and waiting after completing them before moving on to the next. I will do my best to convince you to try this, though, because it is possibly the most delicious cake ever.
 The cake batter was started with a simple mix of softened butter, dark brown sugar, eggs, vanilla, and rum. Once combined, flour mixed with baking powder, baking soda, and salt was alternately added with buttermilk. The cakes were baked and cooled. Then, what I’m going to call the best frosting ever was prepared. To make it, butter was melted and browned, then dark brown sugar, cream, and salt were added. It was brought to a boil while whisking and cooked for three minutes. That lovely, lovely mixture was transferred to the bowl of a mixer and left to cool. Once cool, additional butter was mixed into it. In a separate bowl, cream cheese was mixed with confectioners’ sugar, and then it was added to the butter mixture and mixed until smooth. The frosting then needed to be refrigerated to firm up a bit, but I recommend you taste it several times as it chills only because it’s incredible. Butterscotch cream cheese frosting should top everything from cinnamon rolls to toast. Ok, the cake was baked and the frosting was almost ready, but there was one other component to this cake. A butterscotch sauce was made by mixing sugar, butter, corn syrup, and salt in a small saucepan. This was cooked over medium-low heat until the sugar dissolved and then it was brought to a boil. Off the heat, cream was added, and then it was cooked for two more minutes and allowed to cool. This sauce was brushed over the cake layers before they were frosted. The layers were stacked, frosting was generously applied, and chopped, toasted pecans were added on the sides.
 As I tasted the different parts of this at each step along the way, I repeatedly said that this was the best cake I’ve ever made. The frosting with sweet dark brown sugar and browned butter with a hint of salt mixed with cream cheese was scandalously good. There was no counting of calories while enjoying this cake. It’s too delicious for you to even care.

 This is the cake Kurt chose for his birthday this year. It wasn’t just any birthday, so the cake needed to be a little special. This cake was made to celebrate Kurt’s 40th birthday. We actually did quite a lot of celebrating for this momentous, milestone of a birthday. We spent a long weekend in Las Vegas and indulged in several incredible meals. Sure, there was a little gambling and we were there for Super Bowl weekend, but all those interesting restaurants in such close proximity to one another was the highlight for me. I’ve included descriptions of our meals and links to the restaurants on facebook. You can read all about it and even become a fan if you’d like while you’re there. So, after returning home, I baked this festive cake and the celebration continued. The cake is found in The Greyston Bakery Cookbook. With freshly grated coconut and coconut mousse between the layers and as frosting, I was pretty sure this was going to be good.
 In the book, it’s presented as a three-layer, eight inch cake. I made two nine-inch layers instead. The cake itself is very straightforward, and the batter is made with flour, baking powder, salt, egg yolks, sugar, melted butter, milk, and vanilla extract. There was supposed to have been some coconut extract which I wasn’t able to locate, so I used coconut milk instead of cow’s milk. Maybe I should have tried a baking specialty store to find coconut extract because it was nowhere to be found at Central Market, Whole Foods, Williams Sonoma, or Sur la Table. The coconut milk was a fine substitution, and once the batter was mixed, egg whites beaten to a state of stiff peaks were folded into it. The cakes baked for about 30 minutes and were cooled. Don’t skip the parchment rounds in the pans before pouring in the batter, because these cakes were not the easiest to remove. While the cakes cooled, a very simple mousse was made with just heavy cream, confectioner’s sugar, vanilla, and freshly grated coconut. Again, there should have been some coconut extract, but I skipped it. The recipe suggests using two coconuts worth of gratings for the mousse and for decorating the cake, but I used one and had plenty. I grated the coconut finely for the mousse. Then, for the outside of the cake, I grated larger pieces of coconut and toasted them in a 400 F oven for eight minutes or so. I liked the look of the toasted coconut, and the nutty flavor and crisper texture of it were nice too.
 I was a little worried the whipped cream mousse may not hold up well in the refrigerator after a day or so, but I was completely wrong about that. The cake survived well for four days with no running mousse at all. In fact, it was still light, airy, tender, and delicious right to the end. The coconut extract may have given it even more flavor, but as it was, it didn’t seem lacking to me. Kurt was happy with his birthday cake, and hopefully that’s not just because he’s so old he doesn’t even know what he’s eating anymore.

 Let’s just jump straight to dessert. Back when I baked the oatmeal maple bars from the Greyston Bakery Cookbook, I mentioned that the mocha kahlua cake from that book might be nice for dessert on Christmas Eve. Well, it most certainly was. This is a cake of rich, chocolate layers with a kahlua custard between them, and it’s topped with a mocha buttercream frosting. If you follow the instructions exactly, you’ll have a very grand cake that’s three layers tall. I went for a slightly less grand final version of only two layers, and I baked the remaining layer’s worth of batter into cupcakes which are in the freezer now. I made the full amount of custard and the extra bit intended for a second layer of filling became a nice, little snack. I also made the full amount of frosting and gave the top of the cake a thick coating.
 The cake batter was made with cocoa powder and espresso powder and six separated eggs plus two additional egg whites. The whites were beaten into soft peaks and carefully folded into the batter. After the cakes came out of the oven, they were brushed with kahlua which added flavor and kept them moist. As the cakes cooled, the custard was made with the two remaining egg yolks, sugar, cornstarch, half-and-half, and kahlua. I tasted it several times as it thickened to be sure it was as delicious as I thought it was. It was. The custard was chilled and then layered between cakes, and then the stacked layers were chilled for about an hour. Last, the buttercream was made with, of course, butter, cocoa powder, more kahlua, confectioner’s sugar, and half-and-half. It was a thick and sturdy frosting with just enough chocolate flavor. The finished cake does need to remain in the refrigerator, and I just barely had space for it.
 As the cake sat for a few hours, it became even more tender from the kahlua soaking and the custard layer. Although kahlua was added in several places throughout this recipe, this wasn’t a boozy tasting cake. It was chocolaty and mocha-sweet with just a little taste of the liqueur edge. There was a nice mix of flavors, and that mix was just rich enough without being too much. When asked to choose a type of cake, Kurt has always said ‘chocolate,’ but from now on, he may start saying ‘mocha kahlua chocolate.’


Of course I didn’t send Kurt off to his potluck lunch with just bread sticks. How could I pass up the opportunity to bake something sweet that would be taken away, shared with others, and not left in the house to tempt me? This gave me the opportunity to bake from The Golden Book of Baking which I received as a review copy from Barron’s. This pretty book, with gold, gilded page edges and a gold dust jacket, covers every area of baking with cookies, bars, small cakes, layer cakes, pies, tarts, yeast cakes, and a few savories items as well. It’s full of classics, some twists on favorites, and a few items that were new to me. There’s a photo of each and every recipe, and the recipes have been graded for degree of difficulty. Most are either a one or a two, but there are a few level three recipes. As I read through the book, I marked pages that immediately caught my attention. The chocolate caramel squares look like homemade Twix bars. The Irish cream cake sounds delicious with the coffee frosting. The Portuguese meringue cake, which was new to me, is a rich cake that’s sliced into layers and soaked with caramel syrup, then topped with meringue, and baked until brown. And, there’s a pumpkin pie with a top crust. I’d never before seen a pumpkin pie with a top crust, and I have to try that too. But first, the apple and cream cheese cake could not be denied. I could tell by looking at the photo in the book that this cake would travel well, and I guessed that with the butter and cream cheese in the batter, it would be even better the day after it was baked.
 Cream cheese, butter, sugar, and almond extract were mixed until fluffy, and then eggs were added. Flour, baking powder, cinnamon, baking soda, and salt were sifted together and then added to the butter mixture in alternating turns with some milk. Regarding that cinnamon, I had just read an article in Saveur about different types of cinnamon so I looked around at the grocery store to see what my options were. I bought some Vietnamese high oil ground cinnamon, and it was like a wonderful, super-cinnamon compared to what I usually use. I highly recommend it for this kind of cake or any baked item in which cinnamon is the focus. So, the mixed batter went into a thirteen-inch by nine-inch baking pan that I had lined with parchment paper since I wanted to remove the finished cake from the pan. Two granny smith apples were peeled, yes I actually peeled the apples, and they were sliced and then tossed with sugar, flour, and more of that super-cinnamon. The apple slices were layered on top of the cake batter, and then the cake baked for about 50 minutes.
 The serving suggestion in the book was to add a dollop of whipped cream to each piece of cake, and that would have been perfectly delicious. However, since a bowl of whipped cream that would have to be refrigerated would have over-complicated the matter, I instead glazed the cake with melted apricot jam. I cut the cake into pieces and sneakily kept a couple of them at home. My guess about the cake getting better the next day was correct. The butter and cream cheese gave it a very tender crumb, and the tart apples and warm cinnamon flavor combined to make this simple cake a delight.


