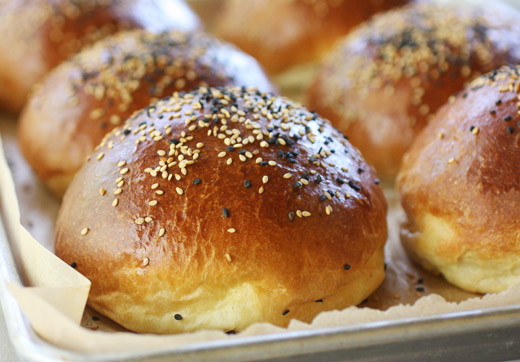
 book, and that book has never disappointed. The buns are made from the raisin brioche bread dough recipe only you skip the raisins of course. It is a three-day process to make them, but not much work is involved on any of those days. The first day is for making the sponge with both sourdough starter and some yeast, and that sits for a day. The next day, the dough is mixed, and that again is left for a day to develop flavor while it ferments. Day three is for shaping the buns and baking, and the dough is so delightful to work with and smells so fantastic, you'll be happy to do this. The only change I will make next time will be to cut the dough into fourteen buns instead of twelve because even though they were shapely and kind of stunning at a nice, big size, they were a bit bigger than I expected for hamburger buns.I did say this was a three-day bread, but it really was very easy. It only took a few minutes to mix the sponge made from water, yeast, sourdough starter, milk, and bread flour. It was covered and left at room temperature for about twelve hours and then placed in the refrigerator for twelve hours. The next day, the brioche dough was made. First, five eggs were whisked in a small bowl. Then, in the bowl of a stand mixer, the sponge was combined with half the eggs, more bread flour, and sugar. After mixing with a dough hook, the remaining eggs were slowly added. Once the eggs were incorporated, the mixer was turned to high speed, and this gives it a workout, and the dough was mixed until smooth. The stand mixer will move around from the weight of the dough, so don't walk away. Next, the fun, decadent part of brioche happens in which nine ounces of butter is slowly added piece by piece as the mixer continues at a slower speed. When the butter has all been worked into the dough, you remove the dough from the bowl and knead for a few minutes, and that's it for day two. The dough was placed in an oiled bowl, covered tightly, and left in the refrigerator to slowly ferment for a day. On the third and final day, the dough was divided into twelve pieces which resulted in rather big buns, and next time I will divide it into fourteen, but those twelve pieces of dough were left to rest under a towel for a few minutes. After resting, each piece of dough was formed into a smooth bun and placed on a parchment-lined baking sheet. Six buns fit on each of two sheets. The baking sheets were covered with towels, and the buns were allowed to proof for three hours. Before baking, I brushed them with an egg wash and sprinkled on black and white sesame seeds. They baked for a total of about 25 minutes with some water spritzing for the first five minutes.

 , and there was something different and kind of ingenious about this bread book. After all the the interesting tips and information about making a wild yeast starter and crafting dough and the different types of breads and how to bake them, there’s a section full of suggestions for using day old bread. Seeing several dishes made with bread made the thought of having a house full of home-baked loaves even more delightful. The various, seasonal kinds of bruschetta, sandwiches, uses of breadcrumbs and croutons, and the delicious photos of all those things give you one reason after the next to bake more bread. So, I just had to decide which bread to make first. The beginning of the book is devoted to describing how to make a basic country loaf, and then all of the other breads are some sort of variation on it. I was distracted at first by the brioche dough and the beignets made from it, but I chose to begin with a whole wheat bread packed with flax and sunflower seeds. If you don’t have a sourdough starter in your possession, Robertson suggests a simple enough way of making one, and he recommends feeding it with half white and half whole wheat bread flours. My starter is always fed with white bread flour, so I began by separating some starter and feeding it with the recommended mix of flours for a day before beginning this bread dough.There were two key elements to the bread making process in this book. One of those was the baking method which I’ll explain more below, and the other was the goal of achieving a not so sour taste in the bread by only using a scant tablespoon of the mature starter when making the leaven. The night before the dough was to be made, one tablespoon of starter was mixed with warm water and white and whole wheat flours and left at room temperature until the next morning. For whole wheat dough, the leaven was then added to more warm water, all-purpose flour, and whole wheat flour, and it was mixed and left to rest for about an hour. Robertson explains that a whole wheat dough requires a longer rest after mixing that a white flour dough. After resting, salt was added, the dough was transferred to a clean bowl for the three hour bulk fermentation, and it was left until the turning began. Every 30 minutes, the dough was folded or “turned.” For the flax and sunflower seed bread variation, one cup of sunflower seeds was toasted, and one cup of flax seeds was soaked in boiling water. I would have expected the seeds to be added with the salt before the bulk fermentation began, but instead they were added after the second turn or one hour into it. Now, soaking the flax seeds causes them to become a little sticky and mixing all those little seeds into the dough takes a bit of squeezing and folding and mixing by hand. That seemed like a lot of working of the dough at that point of the bulk fermentation, so I may try adding them earlier next time. The next steps involved dividing the dough in two and giving both pieces a bench rest, and then each piece was shaped into a boule, rolled in one cup of raw sunflower seeds, and placed in bowls lined with towels that had been coated with all-purpose and rice flour for the final rise. I placed mine in the refrigerator for about twelve hours before baking. And, the baking involved that other interesting technique I mentioned. Rather than introducing steam in the oven with a spray bottle of water or by pouring water into a pan placed on the oven floor, a cast iron pan with a lid was used. The pan was heated in the oven with its lid, the dough was placed in the hot pan and carefully slashed, the lid was placed on top, and the bread began baking at 450 degrees F. After 20 minutes, the lid was removed, and the bread finished baking.

 which is a two-day process unless you need to bring your sourdough starter to room temperature and feed it before you get started in which case it becomes a three-day process. The first two days’ tasks are minimal, but the waiting time between days is necessary. This panettone recipe is made with a fairly rich dough with an egg and an additional egg yolk and half a cup of butter, and even though the dough is soft and a little sticky, it wasn’t difficult to knead or shape. The fun part was mixing the dried and candied fruits with rum, Gran Marnier, and vanilla so they could sit overnight to plump and absorb great flavors before being mixed into the dough. I made one big loaf in an eight inch springform pan and used the rest of the dough for muffin tin-sized mini panettones.


adapted from Breads from the La Brea Bakery12 ounces water1 cake packed fresh yeast13.5 ounces sourdough starter15 ounces white bread flour12 ounces whole wheat flour2 ounces raw wheat germ2 ounces oats1 ounce amaranth2 ounces sugar1 tablespoon salt2 tablespoons barley malt syrup6 tablespoons milk powdersemolina flour for dusting1 cup dehydrated onion flakes plus 1 teaspoon salt for coating
(I have also used a combination of white and black sesame seeds, poppy seeds, fennel seeds, and salt.)-Place water, yeast, starter, flours, wheat germ, oats, amaranth, sugar, salt, malt syrup, and milk powder in the bowl of a stand mixer with a dough hook and mix on low speed to combine. Increase speed to medium and mix until dough is smooth about four minutes. Turn the dough out onto a flour-free, that’s right no flour, surface and knead it for a few minutes by hand. Cover the dough with a cloth and let sit for ten minutes.-Cut the dough into 14-18 pieces depending on how many bagels you want and how large you want them to be. When divided into 18 pieces, they’re a little smaller than what I usually see at bagel shops. Turn and tuck each piece of dough and leave the balls covered with a cloth to rest for 15 minutes.-Take one piece of dough at a time and roll each into a nine to ten inch rope. Wrap the rope around your hand to form the bagel and pinch to seal the open ends. With the rope of dough around your hand, roll the dough up and back where the ends meet so as to seal. Place each bagel on a parchment-lined baking sheet that has been dusted with semolina flour and cover with a cloth as you continue forming bagels. This will require two baking sheets to fit all bagels. When all bagels are formed and covered, place baking sheets in the refrigerator for 12 to 24 hours. -Pre-heat oven to 450 degrees F. Bring at least four inches of water to a boil in a wide stockpot, and remove bagels from the refrigerator to let them come to room temperature while the oven heats and the water comes to a boil. On a wide plate or tray, scatter the dehydrated onions and mix in the salt. As bagels are removed from the parchment-lined baking sheet, sprinkle the parchment with more semolina flour. When the water is boiling rapidly, drop three bagels at a time into it. Press them lightly with a wooden spoon to hold them below the surface for ten seconds. Turn them and let them cook for ten seconds more. Then, remove the bagels and place them rounded side down in the dehydrated onions. Turn and press to apply the coating and then place bagels back on the semolina-dusted, parchment-lined baking sheet. When one sheet is full of boiled and coated bagels, place it in the middle of the oven, reduce oven temperature to 400 degree F, and bake for 20 minutes or until golden brown. Rotate the baking sheet after 10 minutes. After removing the first baking sheet, turn the temperature back up to 450 degrees F, and repeat baking process with second sheet of bagels.I’m submitting this to Yeastspotting where you’ll find some seriously well-made bread.
Cinnamon rolls are one of my many weaknesses. They are excellent breakfast sweets just as they are. Lately, however, I’ve started seeing more and more varieties of rolls like sticky lemon rolls, coconut pull apart rolls, and butterscotch sticky buns. And, did you see Foodblogga’s blueberry sweet rolls last summer? Then, I just saw another version of blueberry cinnamon rolls on Health Nut a couple of weeks ago. I started getting ideas about changing things up with a slightly more wholesome sweet roll made with sourdough and whole wheat flour, and Texas-grown blueberries are everywhere I look lately. Blueberries on their own would have been great, but I thought using both blueberries and raspberries would give these some Fourth of July spirit. I followed a recipe for sourdough cinnamon rolls using half whole wheat flour and half all-purpose flour. The recipe states the commercial yeast and vital wheat gluten are optional. I added the yeast but not the gluten. The dough also included sourdough starter, water, sugar, powdered milk, melted butter, and eggs. With less butter, no cream cheese, and whole wheat flour, these were virtuous sweet rolls compared to the last ones I made. I let the dough rise for a few hours, and then rolled it into a big rectangle. I spread on two tablespoons of softened butter and scattered the berries, one half pint of each, that had been tossed with a little sugar and lemon zest and a tablespoon of flour. The dough was rolled up and cut into smallish pieces. I went with shorter rolls this time in an attempt to limit the calories per roll. They were practically guilt-free. I let them sit in a baking pan, covered with plastic, in the refrigerator overnight, and baked them the next morning. Once baked and cooled, I made a simple glaze with confectioners’ sugar and lemon juice to swirl on top of each.
I’m submitting this to Yeastspotting where you’ll find some seriously well-made bread.

 , and the author’s goal made perfect sense to me. William Alexander set out to bake a loaf of peasant bread each week for a year with the hope of figuring out how to make perfect bread. Along the way, he sought out experts in everything from baking to yeast to milling and learned about bread from every angle. I was intrigued by that information shared throughout the book. He started by questioning why most flour is enriched and learned about why the vitamins were added and that added malted barley assists yeast in feeding on sugars in the flour. Then, he moved on to questioning the chlorine in the tap water he was using. He learned about conditioning the dough, or an autolyse, which involves letting the dough and the glutens in it rest before being kneaded. And, then he learned about sourdough or levain. My sourdough starter is my hard-working buddy who has been helping with my bread baking for over a year now. So, I was geekily thrilled when he started baking with sourdough. He does go a couple of steps further than even I would when he grows his own wheat and sets out to build his own bread oven. Although, I’d love to have a bread oven if someone else built it. He explains the bread baker’s percentage which I previously didn’t know. The details and trials and tribulations are entertainingly described with plenty of self-deprecating humor. I won’t reveal the end of the story, but I will say that ultimately the journey was about more than just baking bread. It was about setting a goal, becoming immersed in it, and learning more than you ever thought you would in trying to attain it. At the end of the book, there’s a description for how to make a levain and four bread recipes. I attempted the Pain au Levain Miche. Alexander explains that this is a very wet dough that will flatten out on the peel. For me, it not only flattened, it stuck like glue to the peel. It was a misshapen, flat, ugly dough pile by the time I got it into the oven. It’s in my freezer now, but it’s destined to become croutons or possibly just breadcrumbs. Next, I tried the Pain de Campagne, and that’s the bread pictured here. It’s made from levain, or sourdough starter, bread flour, whole wheat flour, rye flour, salt, a tiny bit of commercial yeast, and water. The dough ingredients were mixed and left to autolyse for 25 minutes. I used my mixer with a dough hook to do the kneading after that. With a mixer, it was only kneaded for about three minutes. Then, the dough was left in an oiled bowl to ferment for five hours. After it had risen, the dough was set on a floured surface and shaped into a boule. I placed it in my bread proofing basket, covered it with plastic, and refrigerated it overnight. It could have just sat for another two hours before being baked. The next morning, I removed the dough from the refrigerator while the oven heated to 500 degrees F. Following the recipe instructions, I placed a cast iron skillet on the bottom of the oven. After slashing the loaf and loading it into the oven, one cup of water was poured into the skillet. Wear an oven mitt when adding the water. The hot steam rises immediately. The oven temperature was reduced to 480 degrees F, and the bread baked for 25 minutes. The oven temperature was reduced again to 425 degrees F, and the bread baked for another fifteen minutes or so. It should reach an internal temperature of 210 degrees F. Then, the oven was turned off, and the bread remained in it for a few more minutes before being cooled on a rack.
130 grams water
For the dough:
260 grams levain
400 grams unbleached all-purpose or bread flour
60 grams whole wheat flour
30 grams whole rye flour
13 grams salt
1/8 teaspoon instant yeast (also called bread-machine, fast-acting, or RapidRise yeast)
292 grams water (at room temperature)
1. At least two hours before beginning (you can do this the night before), feed the levain as follows: Remove from the refrigerator and add equal parts flour and room-temperature water (I use about 130 grams each, which replenishes what I'll be using in the bread). Stir well, incorporating oxygen, and leave on the countertop with the cover slightly ajar. The starter should be bubbling and lively when you begin your bread.
2. Place a large mixing bowl on a kitchen scale and add each ingredient in turn using the Tare button to zero out the scale between additions. Mix thoroughly with a wet hand until the dough is homogenous. Cover and leave the dough to autolyse for about 25 minutes.
3. Remove the dough to an unfloured countertop and knead by hand for seven to nine minutes (or if you insist, you can use a stand mixer with a dough hook for two to three minutes) until the dough is elastic and smooth. During the first minutes of kneading, a metal bench scraper is useful to scoop up te wet dough that clings to the countertop.
4. Clean out the bowl (no soap, please), mist with oil spray, and replace the dough, topping with a piece of oiled plastic wrap. Ferment at room temperature (68-72 degrees F) for four to five hours.
5. Remove the dough, which should have risen by about half, to a lightly floured countertop and gently press into a disk about one inch high. Form a boule by gathering the sides into the center, creating surface tension, then place seam side up in a colander covered with a well-floured linen napkin. Return the plastic wrap atop the dough and set aside to proof. Meanwhile, place a pizza stone in the lower third of the oven and an old cast iron skillet or pan on the bottom shelf. Preheat the oven to at least 500 degrees F.
6. After one and a half to two hours, carefully turn the loaf onto a baker's peel that has been liberally sprinkled with rice flour or cornmeal. Sprinkle the top of the loaf with rye or rice flour (not white flour, which turns brown) to get that country "dusted" look.
7. Make several symmetrical slashes (grngnes) with your lame or single-edged razor.
8. Immediately slide the loaf onto the stone and add one cup water to the skillet (wear an oven mitt), minimizing the time the oven door is open. Reduce oven temperature to 480 degrees F.
9. After 20 to 25 minutes, or when the loaf has turned dark brown, reduce oven temperature to 425 degrees F.
10. Continue baking until the loaf registers 210 degrees F in the center (about 50 to 60 minutes total) with an instant-read thermometer, or until a rap on the bottom of the loaf produces a hollow, drumlike sound. Return the bread to the oven, with the oven off, for about 15 minutes. Allow the bread to cool on a rack at least two hours before serving.
I’m submitting this to Yeastspotting where you’ll find some seriously well-made bread.


I’m submitting this to Yeastspotting where you’ll find some seriously well-made bread.

My sourdough starter just turned one year old. I’m proud of everything it did in that first year, but I think it can do a lot more. Out of fear, I stuck pretty closely to the Breads from the La Brea Bakery book all year since that’s where it all started. I followed the instructions in that book for making the starter, and I’ve only used that book for baking bread. It hasn’t failed me yet. I’ve made the bagels several times, and just this morning I was branching out by adjusting that recipe to include some whole grains. But, now that a whole year has gone by, I’m ready to start attempting some other sourdough breads. When I saw these sourdough corn bread bowls at Wild Yeast, they went to the top of my list. I loved the idea of cornmeal and corn flour used with sourdough, and a bread bowl for a winter soup was perfect. I followed Susan’s instructions carefully, and everything went fine. I think it’s going to be fun to keep trying new and different sourdough recipes. For the soup, I had a hearty vegetable chowder in mind, and I found just the thing I wanted in Vegetarian Cooking for Everyone.
The sourdough corn bread was a breeze to mix. I combined bread flour, corn flour, coarse corn meal, water, salt, a little butter, and sourdough starter in the bowl of a mixer and let the dough hook do the work. The dough was transferred to an oiled bowl where it fermented for two and a half hours. It was then divided into six pieces which were left to rest for 30 minutes. Then each of those pieces was placed in a soup bowl, covered, and refrigerated until I was ready to bake. I let the dough come to room temperature while the oven pre-heated. Just before sliding the little loaves into the oven, they were slashed around the tops. The oven was spritzed, and I placed the loaves directly on a baking stone. The circular slash on each loaf made a good cut line for removing the tops and turning them into soup bowls.
 The soup was even easier to prepare. First, parsley, thyme, bay leaves, sliced onion, peppercorns, and juniper berries were steeped in milk that was brought to a boil. That was covered and set aside while chopped leeks, carrots, turnips, rutabaga, celery, and potatoes were cooked in melted butter. After about 10 minutes, flour was stirred into the cooked vegetables, and then water was added. That was left to simmer for 25 minutes. Last, the milk was poured through a strainer into the soup, and seasoning was checked and adjusted.
 A simple meal of bread and soup with some great cheese and olives seemed like a feast. The cornmeal and corn flour brought a little sweetness to the bread, and the crunchy crust gave way to a chewy, tasty, light yellow interior. The soup was a showcase of fresh, local, winter vegetables that was thickened just enough from the flour, starch from the potatoes, and the milk. As the soup disappeared in the bowl, it was easy to drag your spoon across the inner surface and bring bits of bread through the remaining chowder. Even better than that was pulling the bowl apart and eating the whole thing.
 I’m submitting this to Yeastspotting where you’ll find some seriously well-made bread.

I’ve been baking from the Breads from the La Brea Bakery book since earlier this year, and at this point, I’ve made a few of the dough recipes more than once. For instance, I’ve practically memorized the bagel recipe I’ve made that one so many times. But, now that I’ve worked with the rustic bread dough a second time, I think it might be my favorite so far. It’s a very wet and sticky dough, and it seems like it’s going to be nothing but a mess until it comes out of the oven with a crisp crust and chewy, open interior full of fresh-baked, sourdough flavor. In the book, Silverton describes what the dough should feel like after it has proofed for two hours: ‘it should feel soft and alive.’ It did feel alive in that the dough was so tender, you could tell it was going to get bubbly, and it seemed full of energy. There are a few recipes in the book that use this dough, and these bread sticks are one of them. Kurt was in need of some kind of bread to take to a company potluck lunch, and I thought that bread sticks might be more fun than dinner rolls. I was also inspired by some parmesan and poppy seed bread twists I saw in Gourmet magazine a few months ago, so I added those toppings to these.
This particular dough is possibly the quickest one to make in the La Brea book. Water, sourdough starter, half of a fresh yeast cake, and bread flour were mixed with a dough hook in a stand mixer and then left to sit for 20 minutes. Then, salt was added and mixed into the dough. Some milk, olive oil, and a little more water were stirred together in a bowl before being slowly added to the dough while the mixer was running on low speed. The dough was very wet and sloshy at this point, and it was necessary to continue mixing slowly until it came together a bit. Finally, it was mixed at higher speed until all the liquid was fully incorporated. At that point, the dough was left in the bowl of the mixer, was covered with plastic wrap, and fermented for two hours. After fermenting, the dough was quickly turned out onto a very well-floured surface, and by quickly turned out, I mean plopped because there really is no shaping to be done with this dough. It just is what it is. I sort of pulled it into a rectangular-ish shape. The dough was sprinkled with more flour, covered with a towel, and was left to proof until it felt ‘alive’ which was an additional two hours. Some bubbles were forming, and the dough was otherwise smooth and lovely. I chose to brush the top with olive oil and then distribute grated parmesan and poppy seeds. Now, the goal was to cut approximately one-inch wide pieces and then stretch them as they were dropped onto a semolina-dusted, parchment-lined baking sheet. Well, this dough being what it was, I cut more or less around an inch-or-so-wide pieces, tried to pick them up and place them on the sheet without turning them into jump ropes, and then dropped them while attempting to twist the dough a little as it fell. They were rustic but no less delicious for it.
 The bread sticks baked at 450 F with some water spritzing of the oven during the first five minutes and were golden and crisp after a total of 25 minutes. Kurt was happy to take these for his potluck lunch, and he was even happier that I set a few aside to keep at home. All of the other breads from this book have been great too, but there’s something about this dough that makes it special. I have a feeling I’ll eventually memorize this recipe.
I’m submitting this to Yeastspotting where you’ll find some seriously well-made bread.
 Every year at this time, we enjoy the arrival of hatch chiles from New Mexico. They appear in our grocery stores, and we look forward to using as many of them as we can before they’re gone for another year. Our nearby Central Market sets up big, rotating roasters, and the smell of chiles fills the parking lot. You can buy the chiles fresh or roasted and bagged, and they’re available in hot and mild. They’re also used in all kinds of products throughout the store such as hatch chile hamburger buns, hatch chile cheese, hatch chile sausages, etc. So, in honor of these chiles, and just because it had been too long, an Austin food blogger potluck was held on Sunday, and the dishes were to be hatch chile-themed. Now, the last time I attended a food blogger potluck, I decided I should only use tried and true recipes. This time I went another way, got a little experimental, and worried even more about what I made. My sourdough starter hadn’t been used for weeks, and I had never before shared any of my sourdough bread with anyone other than Kurt. So I chose to experiment with a hatch chile and garlic bread and let other people sample it for a change. I took inspiration from a roasted garlic bread by Dan Lepard and once again worked from the Breads from the La Brea Bakery book.
 I followed the recipe for the Italian ring bread, but instead of folding chopped marjoram into the dough, I used chopped, roasted hot and mild hatch chiles and whole cloves of roasted garlic. This dough made use of both sourdough starter and fresh yeast, so I hoped it would have enough strength to rise with the vegetables I added. The recipe is written as a two-day bread, but there is a 12 hour waiting time on the second day. I timed it out to make it a three-day bread instead. Day one only required making a sponge from starter, bread flour, and water. On day two, the dough was made from the sponge, fresh yeast, bread flour, salt, olive oil, chiles, and roasted garlic. It started as what I thought was a slightly too dry dough, but after adding the vegetables, it seemed slightly too wet and sticky. I kneaded in a little more flour and crossed my fingers.
 It went through the usual rituals of resting, kneading, fermenting, being divided, resting again, and then being formed into boules which were refrigerated overnight. On day three, the dough was brought up to room temperature and then turned out onto a board. A peel was floured so a boule could be loaded on it, and then a hole was cut in the center of the boule with a biscuit cutter. The hole was to be stretched to three times its original size, and the piece of dough removed was baked as a roll. Luckily, I baked one loaf at a time because the first one suffered from the hole not being made large enough. It closed in on itself like a giant bialy, but I got it right the second time. Of course, the oven was spritzed a couple of times during the first five minutes of baking, and that produced a crispy, crackly outer crust.
The interior was chewy and similar in texture to ciabatta although less open in structure. With the chiles and garlic, each piece of bread was almost a meal in itself, and I liked that about it. I think this bread with some cheese on the side would be great for a picnic. One loaf was taken to the potluck, and the other will be re-warmed and served with salad for dinner tonight. I survived presenting my homemade bread to a group of food bloggers, and they were even kind enough to say they liked it.
I’m submitting this to Yeastspotting where you’ll find some seriously well-made bread.

 Last weekend, with Bastille Day approaching, I made a plan to prepare some French food and decided to give the baguettes from the Breads from the La Brea Bakery book a go. This is the one bread that had me completely intimidated. It’s such a simple thing. They’re everywhere. Why so scary? Well, I had read about how tricky it can be to create a great baguette with the right crust, a good texture, and some flavor, and I had no idea what kind of results I could hope to expect. In the intro to this recipe, Silverton describes in detail what she believes makes a good baguette and the difference between fluffy ones and the rustic sourdough variety. Her recipe, and what you see here, is the latter. The classic, airy baguette is made with commercial yeast, but many of those contain added conditioners and extra yeast in an attempt to prolong their shelf life. Rustic sourdough baguettes have a caramelized brown exterior and pointy, irregular ends rather than smooth. The crust is slightly thicker and should shatter when you bite into it. The bread should compress as you bite it and then slowly rise back into shape. As usual, I followed the instructions in the book exactly, with a lot of uncertainty, and winged it.
 This happens to be the same dough recipe that I followed for my first ever use of sourdough starter. There is no additional commercial yeast, just sourdough starter, bread flour, raw wheat germ, water, and salt. It was February when I made that first bread, and the house was several degrees cooler. Since then, my starter has developed better flavor, and the warmer temperature in the house this time around had a great affect on the dough rising. It worked so much better this time I was amazed. After the first rise, the dough was split into four pieces which were allowed to rest for 15 minutes. Then, each piece was folded and then rolled and shaped into a baguette. The rolling was actually easier with no flour on the board. It’s necessary for there to be some friction for the dough to be lengthened into the proper shape. Speaking of the proper shape, these are not skinny, classic baguette batons. Silverton points out that you should create the loaves to fit your oven, so for most home ovens, they will have to be shorter than commercial baguettes. I actually made mine the length of my baking stone, so they weren’t even quite the full size of my oven. The shaped loaves were nestled into a floured cloth, covered with another cloth, tucked into a plastic garbage bag, and left to rest in the refrigerator overnight.
 The usual baking procedure was followed the next day. The loaves were removed from the refrigerator and allowed to come up to room temperature while the oven was heated to 500 F. The loaves were slashed, and I really need a good razor to do this because a knife just doesn’t work very well, the oven was spritzed, the temperature was reduced to 450 F, and in went the loaves. More spritzing ensued during the first five minutes, and the total baking time was about 30 minutes.
 I was almost afraid to look in the oven at the end of the baking time. What if there was no caramelized brown crust? What if they were pale, sickly, distant cousins of a rustic baguette? And, then, I opened the oven door. And, then, I started dancing around and screaming about how pretty they were, and then I had to wait before I could taste them. Finally, I picked up a bread knife. The crust seemed good as I cut a piece. After a hurried photo shoot, I finally tasted it, and I realized this was the best bread I’ve made yet. All of that information about how the crust should shatter and the bread should compress was exactly what I experienced. I couldn’t believe it, and I think I have the weather to thank for it. I’ll definitely be baking baguettes year-round, but I have a feeling the summer bread will be hard to beat. This bread alone is worth the effort of maintaining a starter. I almost forgot, most importantly, I have the French to thank for inventing baguettes. Happy Bastille Day!
I’m submitting this to Yeastspotting, hosted this week by Nick at imafoodblog, where you’ll find some seriously well-made bread.


