I suppose I can’t say that I’d never made popovers before. I did make mini popovers in a mini muffin tin a couple of years ago, and technically, you can make even full-sized popovers in a regular muffin tin. But, what I’m showing here today were my first, proper popovers made in a popover pan. I had clipped this recipe from Food and Wine back in September of 2009, and one thing led to another as it often does in my kitchen, and I only recently acquired a popover pan so I could try this. The effort is so minimal and the result so lovely, there are sure to be many, many popovers in my future. How often do you just whisk a few ingredients together with no need for a mixer and no complicated steps and end up with golden, crisp little breads that are so airy, light and delicious on the inside? The orange zest was an added benefit to their flavor, and adorned with a simple berry jam, they made my morning for a few days in a row.You start with two bowls. In one of them, whisk together eggs, sugar, orange zest, milk, and melted butter. In the other bowl, whisk together flour, baking powder, and salt. Then, whisk the wet ingredients into the dry, but just until only small lumps remain in the batter. That’s it. The cups of the popover pan were brushed with melted butter, and the pan was warmed in a 425 degree F oven for five minutes before each cup was filled halfway. The popovers baked for 30 minutes and puffed and browned. The flavor, the texture, and even the aroma while these baked, were more complex than the process of making them. I was amazed that such a simple technique produced these delicate yet crisp morning treats. They were divine warm from the oven, and re-heating them the next day and the day after that worked fine too. Now, I can set about altering the flavor or making some just plain or trying a savory version. My new pan will definitely be getting a lot of use.

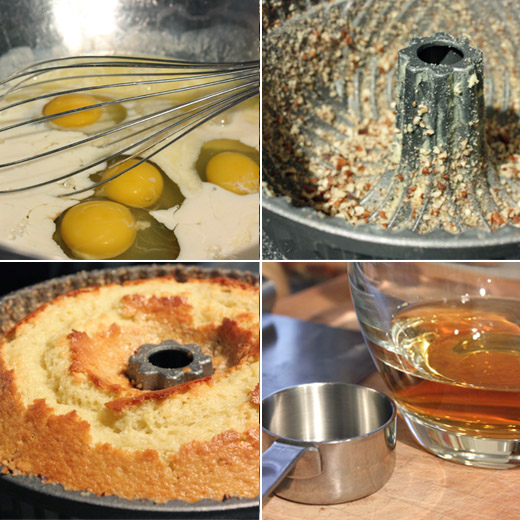
 . It’s similar to a holiday cake that gets soaked in a liquor-filled glaze only this is much simpler. In this case, you only apply the glaze once rather than several times over days or weeks, and the cake batter is one of the easiest ever to whisk together. The rum and orange juice and zest in the cake and the finely chopped pecans that end up coating it give it fantastic flavor before the rum glaze is even applied. Rum cakes that are soaked multiple times can end up tasting very boozy and I do quite like the taste of rum, but it’s not overwhelming here. In the glaze, the rum melds with melted butter and brown sugar into a lovely butterscotch with just a hint of rum. Soaking the cake with the glaze also extends the life of the cake. It gets better as it sits, and it lasts a few days longer than it would otherwise. To gild each serving a bit more, I whipped cream with Grand Marnier to top the cut pieces. This simple whisked batter started with flour, sugar, baking powder, and salt being combined in a large bowl. In a separate bowl, milk, orange juice, vegetable oil, eggs, orange zest, and rum were whisked together and then added to the dry ingredients. The batter was stirred to combine and then carefully poured into a bundt pan that had been buttered and sprinkled with toasted and chopped pecans. You want to pour the batter slowly to as not to dislodge the pecans. The cake baked for about an hour, was left to cool, and was placed on a serving platter, and that’s where I learned a lesson. You should place the cake on a rimmed platter. I somehow believed that the cake would absorb every single bit of the glaze, and I foolishly chose a flat platter. The glaze was made by melting butter in a saucepan, adding sugar and water and stirring while simmering for five minutes. The rum was added off the heat. The cooled cake, on a platter with a rim, is then pierced all over with a wooden skewer before you slowly spoon the glaze over top. Most of the glaze will be absorbed, but some does collect around the base of the cake and that could work its way to the edge of a platter without a rim and dribble all over your dining room table. Whip some cream with a little sugar and Grand Marnier to serve with the cake.
Can I show you one more cookie? I hope you said yes because this was my favorite cookie I baked for Christmas this year. That sounds like I'm being mean to the other cookies, but I'm really not. Of course I liked them all, but this one with the stacked doughs was a different kind of cookie. The technique got me thinking as well. If two doughs can be stacked as they are here, why not three? And, next time, I can try different flavors depending on the season or the occasion. I followed the original recipe for these from the December 1998 issue of Living magazine. I found the page in my files when I was checking to see if there was something I'd tucked away from years past that I should try. I love it when I find a gem like this hiding in my files. So, the two types of dough in this cookie are orange-sable dough to which dried cranberries were added and a chocolate-espresso dough to which toasted walnuts were added.I started with the orange-sable dough, and it was made with almond meal, confectioners' sugar, butter, orange zest, an egg, lemon juice, and flour. You can grind blanched almonds in a food processor or use almond meal as I did. Once the dough came together, dried cranberries were stirred into it, and it was pressed into an eight-inch square pan lined with plastic wrap and set aside. Next, the chocolate-espresso dough was made with flour, Dutch-process cocoa powder, finely ground espresso, butter, confectioners' sugar, and vanilla extract. I used a mix of ordinary Dutch-process cocoa powder and some very dark and rich black onyx cocoa powder which gave the dough a deep, black color. Toasted and chopped walnuts were added to the chocolate dough, and it was pressed on top of the orange-sable dough. The pan was chilled at least two hours or overnight in my case. The next day, I removed the stacked doughs, cut two-inch wide rows which were then cut into skinny, one quarter inch cookies to be baked.

 which I read several months ago but don’t think I’ve mentioned here before. In that book, which is a year-long food diary about enjoying the right food in the right place at the right time, Nigel Slater mentions a meal involving a curry of eggplant, tomatoes, and lemongrass. He explains that he likes to follow a "stinging-hot principal dish" with a "sharp citrus dessert." The thought of a spicy dish with complex flavors followed by an icy, fruity, sorbet appealed to me very much. The curry in the book is made with a homemade paste involving shrimp paste which would have sent me on a day-long ingredient hunt, so I started asking around about eggplant curry recipes. Leela from She Simmers shared with me an informative post of hers about purchased curry pastes vs ones made from scratch, and her post also includes a link to an easy green curry recipe from Kasma Loha-unchit. That’s the version that I made only with mushrooms instead of pork. Then, it was back to the book for the dessert. So, yes, eggplant brought me along a winding path that led to orange sorbet.Making the sorbet couldn’t have been easier. A simple syrup was made, and orange zest was added. Since the juice of a lemon was going to be added later, I zested some of said lemon and added it to the simple syrup as well. Once the syrup was cool, fresh orange juice and the juice of the lemon were added. I left that mixture in the refrigerator to chill thoroughly for a few hours before churning it in an ice cream maker. For garnish, I topped servings with a little lime zest.

 As I was reading The New Spanish Table
 , I was so excited about the tapas, seafood, and rice chapters, I didn’t really even expect much from desserts. I should have known better. There are ice creams, sorbets, and granitas with flavors ranging from honey and cinnamon to beet and strawberry. There are also confections and cookies such as the orange and pistachio magdalenas seen here. These light, little, tea cakes are made with olive oil instead of butter and are flavored with orange juice, orange zest, and orange flower water. Something about the fragrance of orange flower water seems like summer to me. Is there a flower that blooms in the summer with a similar scent? Whatever it is about it, I like it, and it added another dimension to the Moorish-inspired flavors of these delicate, mini cakes. They’re similar to French madeleines but were baked in a mini-muffin pan.
The batter was started by mixing eggs and confectioners’ sugar. Then a combination of flour, salt, and baking powder was added alternately with a combination of cream, orange juice, and olive oil. Last, chopped, toasted pistachios, orange zest, and orange flower water were added. The batter was covered and left to rest for 30 minutes before being baked in buttered mini-muffin cups. After the cakes cooled, they were dusted with a sprinkling of confectioners’ sugar.
 It’s a good thing these are simple to make because they disappear from a serving platter quickly. They’re cute and so light that when you pick up the bite-sized morsels, you quickly lose count of how many you’ve sampled. Since I hid some away to ensure they’d last a few days, I can also report that they keep very well, and the layered orange flavors are perfect with a cup of tea.


Every once in a while, I do ask Kurt what he would like for me to make. It’s only fair given that he suffers the brunt of all of my failed attempts in the kitchen. For Easter, I asked what he thought would be good for dessert. Without even a moment to ponder, he fired back: cheesecake. I liked that idea and of course, chose to make one I hadn’t tried before. This is from Martha Stewart's Baking Handbook, and it states in the intro to the recipe, this is about the easiest cheesecake you can make.
There are two steps which require different appliances, but they’re quick and simple. First, put some fresh ricotta in a food processor and process until smooth. Next, use a mixer to beat egg whites to a stiff, glossy state. That’s it. The rest was just a matter of folding things together. In a large mixing bowl, the ricotta was mixed with egg yolks, flour, some sugar, orange zest, and salt. Then, the egg whites were folded into that mixture. It all went into a springform pan and was baked for about one hour. There was no water bath, so no need to wrap the springform pan in foil. It really was a very easy cheesecake to make.
 It came out of the oven puffed like a souffle, but it didn’t drop like one. It settled into a flat shape with just a little ridge around the outside. The instructions in the book mention turning the cake out of the pan and then inverting it back right side up, but I’m not sure why. I just removed the outer ring of the springform pan and let it sit on the base of the pan. Once it cooled to room temperature, I chilled it in the refrigerator in an airtight container. This was a sleek, grown up kind of cheesecake. It had no crust, no cream cheese, and it wasn’t as sweet as other cheesecakes I’ve made. The texture was lightened by the egg whites but still had some sense of density from the ricotta. It was mildly flavored with an orange accent, and would be perfect with espresso. Since I didn’t think to buy some espresso beans, I served it with a strawberry coulis. Dark chocolate sauce would be another option or maybe a melted marmalade. I think this particular cheesecake could be taken in all kinds of directions with sauces and toppings, and it was pretty delicious all by itself too.


Saturday evening, a couple of friends joined us for dinner. We were celebrating a backyard project getting off to a great start and autumn’s arrival. Although, you need a calendar to know that it’s fall in Austin because the 90 degree weather is still going strong. We toasted the project, and the good company and conversation far outshone the menu, as they should. Just the same, I’m going to write about the food, and I’ll start with dessert. I tried to choose a somewhat simple dessert. I had hoped that a small piece of tart filled with good chocolate would be a nice ending to a big meal. I took this from Pure Dessert by Alice Medrich.
I appreciate Medrich’s precision in her recipe writing. For instance, bittersweet chocolate with 60-62% cacao was listed, and a note was provided for how to change the recipe if 65-72% cacao was used instead. Of course, this should be high quality chocolate. Unfortunately, the definition of chocolate is being reconsidered these days, so referencing the cacao percentage is becoming necessary. The tart making process was very easy. The dough was made with melted butter, was patted into the tart pan, and was baked and then allowed to cool. The filling contained only chocolate, butter, orange zest, and an egg yolk whisked with boiling water. Medrich mentions, and I agree, that the orange and/or grapefruit used here should be organic so no sprays will be on the zested skin. No sugar was added to the filling, and none was needed. Had a higher percentage chocolate been used, a small amount of sugar was to be added. As it was, it was silky-textured and balanced in flavor with a fresh, citrus note. Once filled, the tart was chilled for a few hours.
 For the topping, jasmine tea leaves were steeped in cream for eight to twelve hours. Medrich notes that the cream should be poured through a sieve to remove the tea after twelve hours even if you won’t be using it yet. I steeped the cream overnight, and removed the tea in the morning. When I tasted the cream at that point, there was a lovely, subtly floral, jasmine presence. However, by the time dessert was served, the jasmine was nowhere to be found. It was a nice addition to the cream, and in the future, I’ll time it so the jasmine tea is removed just before serving.
 One other point to mention is the serving temperature. The tart should be removed from the refrigerator about 30 minutes prior to serving so the filling can slightly soften. I failed to give it quite enough time, and the chocolate was a little firmer than ideal. It may seem like I’m nitpicking on several tiny details, but for a dessert like this with so few ingredients, every part of the process matters. The chocolate has to be excellent, the texture has to be right, and all the flavors have to come together. Then, it becomes just what it was intended to be. The result was very good, but next time I’ll know how to make it even better.


